• Welcome to the Vanguard Community

    These forums date back to the game's origins as the Crysis mod Traction Wars. Over the years the game and internet habits have evolved and discord.gg/vanguardww2 is now the principle home of the community.

    The team continue to read and reply to posts here, but we can be contacted more quickly on Discord.

Battleaxe's practical guide to... modelling

Status
Not open for further replies.
I'm back!!

After an arduous end of the semester, and 12 exams in a 16-day time frame, I got back to my stations.

Today, it'll only be a small update, since I didn't have a lot of time on my hands this weekend due to our need to restock on Walloon beer and a poorly timed football game.
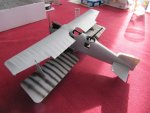
I've glued the hull together, and I made a mock-up to give you an idea of the size of the finished model:
IMG_6166.jpg

Due to the weight of the wings (they're moulded in one piece) the craft sits a bit gingerly on its legs, but they're perfectly capable of keeping it aloft. Next step will be dealing with the seams and apply some other pieces before paint.

I've also compiled a to-do list before the final paint coats can be put on.

- Drill holes for Lewis mount - Done
- Close the hull - Done
- Finish the propellor
- Clean the seams - In progress
- Assemble the tailplane
- Drill holes for rigging
- Fit turnbuckles
- Mask engine and cockpit
- Pre-shade hull
- Pre-shade top wings

That'll be all for now. If you've got questions, please ask.
 
Keep it clean, trooper!

Hello everyone.
As any bloke in the army will tell you, keeping your rifle clean is absolutely paramount. It's so important that it was even mentioned in the manual of the Armstrong-Whitworth 4lb Cannonette. And the same goes for a model builder's airbrush.

I'm currently cleaning mine with Vallejo's Airbrush Cleaner, and you can tell it was the first time it was cleaned diligently. I didn't make any pictures of this, but suffice to say that it was a fate worse than a fate worse than death on the end of a cotton bud. The paint recipient was still fouled by layers of old dried-up paint, and now it's as clean as a whistle.

So: clean your kit after every use, not only with water or white spirit, but also with the stuff that's meant to remove the type of paint you've been using.
 
Last edited:
Painting the wings

Hello everyone!
In the face of this awful tragedy that has occured today, one must show resistance against fear and carry on with your life. Therefore: today's update.

Having recently graduated, I had some time on my hands to continue with the Roland build. I've been on a bit of a painting spree.

IMG_6487.jpg

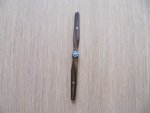
I gave the propellor several coats of coloured varnish, to enhance the wood effects, and painted the central hub.
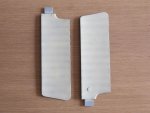
Next, the underside of the bottom wings have been painted. Note how the pre-shading still shines through. The next step will be to paint the interior wing structure with brown paint and cover that with some more of the base colour. To give you an idea: I spent half an hour per wing, with an hour in between to let the air compressor cool.

IMG_6485.jpg

That's all for now, I'll be back probably next week with another update.
 

Killen

Member
Painting the wings

Hello everyone!
In the face of this awful tragedy that has occured today, one must show resistance against fear and carry on with your life. Therefore: today's update.

Having recently graduated, I had some time on my hands to continue with the Roland build. I've been on a bit of a painting spree.

View attachment 1474

I gave the propellor several coats of coloured varnish, to enhance the wood effects, and painted the central hub.
Next, the underside of the bottom wings have been painted. Note how the pre-shading still shines through. The next step will be to paint the interior wing structure with brown paint and cover that with some more of the base colour. To give you an idea: I spent half an hour per wing, with an hour in between to let the air compressor cool.

View attachment 1475

That's all for now, I'll be back probably next week with another update.

How did you do that bright and dark effect on the propeller?
 
How did you do that bright and dark effect on the propeller?

The bright bits are the beige base coat. The dark bits are dark brown paint. This simulates the laminated wood from which the propellor is made. Next, I put on a layer of dark brown oil paint (Winsor & Newton Burnt Umber). This gives the prop a realistic enough wood grain and it darkens the whole item to correspond with known pictures of the Roland.
 
Wow, this is some quality modelling... What scale is this? Looks bigger than 1:48 to me.

It’s 1:32 scale. Wingnut Wings only does kits in that scale.
[MENTION=1]General Naga[/MENTION] I can’t use space in my posts anymore, same as Flying and Aniallator.
 
Back in White

Hello everyone! I'm baaaaaaaack!

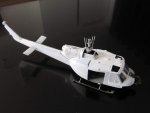
To celebrate the return, we're going to take a trip back to 2015, back when this thread first started. The first practical example that I used was a 1:72nd scale UH-1B helicopter, and it has been worked on.

IMG_6806.jpg

As you can see, it has been largely put together and given a first coat of primer. My first thought was to paint the various subassemblies apart and glue them together at the last instant. Now, this would have presented me with a number of problems, most notably the fitting. This kit is an older one, and the parts do not necessarily fit together well. You can see that there is still a lot of green around the engine covers, and indeed there are still some gaps that need to be filled.

This also brings us to the second point: the primer. Let me start off by saying that this primer is not actually a dedicated primer, but just some white paint. That aside, it performs the exact same function: provide a base coat that's different from the plastic colour.
Why does it need a base coat with a different colour than the plastic? Two reasons. The first has to do with the parts not fitting very well. This base coat allows me to colour sand the parts after they've been glued together to smooth down the seam. You can clearly see this on the tail and the nose. The second reason (and also why I used white) is because of the yellow band that will be painted on the tail, just in front of the vertical stabiliser. Because that band will be airbrushed on, it needs a light-coloured base to avoid using copious amounts of paint just to make it cover over the dark green plastic.

As you can also see, some of the clear parts have also been added. Because the helicopter will be totally sealed shut once the painting will start, I wouldn't be able to fit them afterwards. So I needed to create masks. I used some painter's masking tape (just normal Tesa tape) for this job. Put a piece of tape over the clear part. Then, using a sharp knife blade (preferably one that you haven't used before) trace around the edges of the "glass" that will eventually be visible. Remove any excess tape and glue the clear parts into place. I used cyano glue for that this time, you could also use diluted white wood glue for that. The main windscreen was glued using normal modeller's glue.

That's all for today. Again, if you've got questions, please ask.

I'll be back soon(er)!
 
Last edited:
Status
Not open for further replies.
Top